Setting Up The Campaign
Source: Necromunda: Apocrypha Necromunda (2024)
Setting up an Uprising Campaign is a task that falls to the Arbitrator. To set up the campaign, the Arbitrator must make sure that all of the players have founded their gang and chosen their Allegiance (or decided to begin the campaign unaligned). This is best done in a single evening or session where everyone playing in the campaign meets and goes through all the steps of setting up the campaign together and generally gets excited about the fun ahead.
Set Start And End Dates
The Uprising Campaign is divided into six campaign cycles, separated by a single cycle of Downtime after the first three cycles, meaning that the campaign will last a total of seven cycles. For ease, we have set each cycle as a week, as this is usually how often gaming groups or groups of friends get together to play. However, if the players choose, a cycle can represent a longer or shorter period of real time. The first step in setting up the campaign is for the Arbitrator to determine the start date, the end date and when the Downtime cycle will fall. They then share this information with the players.
Alternative Uprisings
There are many insidious cults operating deep within the underhive. Although this supplement focuses on Corpse Grinder Cult uprisings, players may wish to experiment with other types of insurrection. Genestealer Cult gangs and Helot Chaos Cult gangs both make fine participants in an Uprising Campaign.
Founding Gangs
Before the campaign begins, each player must found a gang using the rules presented in the Necromunda Core Rulebook. The Uprising Campaign is designed to be played using only Underhive battles, though if the Arbitrator wishes, Ash Wastes battles can be included.
Completing a Gang Roster
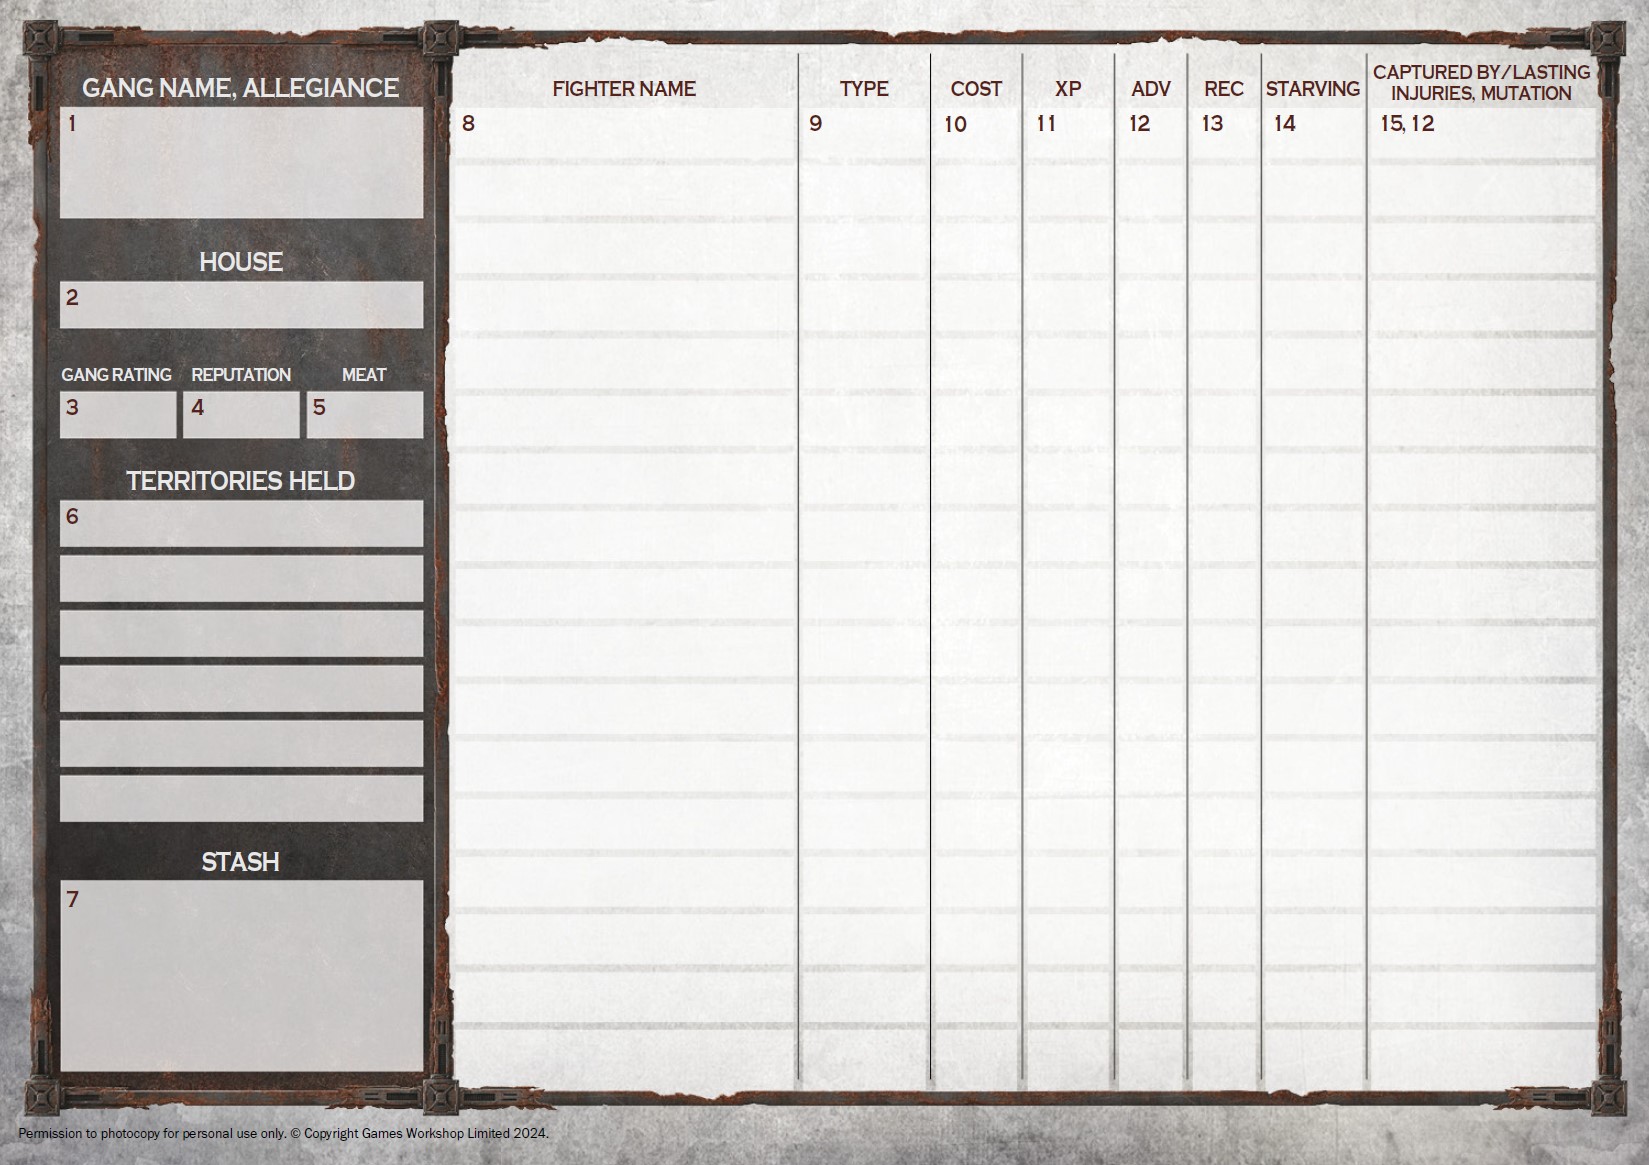
When playing in an Uprising Campaign, players will need to complete a gang roster. The Uprising Campaign roster tracks additional information compared to the one provided in the Necromunda Core Rulebook.
The Uprising Campaign gang roster is made up of a number of elements, as shown opposite: the gang’s name and Allegiance (1) and House (2), its Gang Rating (3), Reputation (4) and Meat (5), the Territories it holds (6) and its Stash (7), containing unspent credits, surplus equipment (both weapons and Wargear), and so on. It also has a line for each fighter in the gang, with space for their names (8), fighter type (9), Cost (10), Experience earned (11), the number of Advancements and/or Mutations gained (12), and whether they are currently In Recovery (13), are Starving (14) or have suffered any injuries or been Captured (15).
Note that although the number of rows is limited, there is no upper limit on the number of fighters a gang can contain. Should a gang be lucky enough to have more fighters than can be fitted onto one gang roster, simply use a second gang roster for extra space.
Choosing Sides
When a hive collapses into anarchy, gangs swiftly find themselves either defending the status quo, or putting a torch to everything in sight. In the Uprising Campaign, two opposed forces are battling for the fate of the hive – the instruments of Lord Helmawr’s authority representing the agents of Order, and those aligned with the rebellion representing the servants of Chaos in all its many forms. When creating a gang for an Uprising Campaign, each player must decide if they represent Order, Chaos or wish to begin the campaign Unaligned. Each comes with its own benefits as detailed below, though be warned, no gang can stand on the sidelines forever and eventually Unaligned players will need to choose between one side or the other.
Some gangs can only be part of either Order or Chaos, their nature deciding their fate when they are created, and players fielding these gangs must join the faction indicated:
- Corpse Grinder Cult and Chaos Helot Cult gangs are always part of the Chaos side.
- Palanite Enforcer gangs and Genestealer Cults* are always part of the Order side.
- All other gangs may choose to be either Order, Chaos or Unaligned at the start of the campaign.
*Players should note that Genestealer Cults have their own insidious agendas and often hide in plain sight, masquerading as loyal Imperial subjects. The machinations of Chaos are anathema to such alien plans, and so Genestealer Cults will readily take up arms to help quell such an uprising, strengthening their own power in doing so…
Benefits Of Order
Gangs aligned with the agencies of Order gain the following benefits:
- Lord Helmawr’s Coffers: The gang may re-roll any dice when determining the amount of credits gained as part of a scenario.
- Pax Imperium: If the gang is the defender in a battle, they may add one more fighter of their choice to their crew than normally allowed by the scenario.
Benefits Of Unaligned
Gangs who have yet to choose their Allegiance gain the following benefits:
- Hard as Nails: When the gang gains Reputation as part of a scenario, it gains 1 more Reputation than normal.
- No Gods or Masters: If the gang’s Leader participated in a battle and did not go Out of Action, they gain an extra D3 Experience points in addition to any other Experience gains.
Benefits Of Chaos
Gangs aligned with the servants of Chaos gain the following benefits:
- Bloody Harvest: When the gang gains Meat as part of a scenario, it gains one more portion of Meat than normal.
- Tear it all Down: If the gang is the attacker in a battle, they may add one more fighter of their choice to their crew than normally allowed by the scenario.
Balancing Order And Chaos
The Uprising Campaign has been designed to work with any mix of Chaos, Order or Unaligned gangs, and it is as possible to find the agents of Order fighting amongst themselves to control the hive as it is for the servants of Chaos to squabble over its ruins. However, as a guideline, an Uprising Campaign should include at least one Chaos aligned gang and one Order aligned gang at the start, with any number of Unaligned gangs. This allows for sides to form naturally over the course of the campaign, with gangs either choosing to fight to save their hive or succumb to the madness of Chaos.
Other alternatives include starting the campaign with all gangs but one aligned with either Order or Chaos – representing a lone beacon of light struggling to hold back the night, or the seeds of corruption planted in the heart of the hive’s hierarchy.
Changing Sides
By default, gangs cannot switch between Order and Chaos during the course of the campaign, as this keeps things simple and ensures that there will always be at least one gang fighting for either side of the rebellion. If the Arbitrator chooses, gangs can be allowed to change sides if certain conditions are met – representing the corrupting influence of the Ruinous Powers or the ruthless cunning of Lord Helmawr’s servants in pitting enemies against one another. Order gangs will fall to Chaos if at least three of their fighters become Chaos Spawn as a result of Festering Injuries (see page 85). Chaos gangs will find themselves unwittingly aiding the forces of Order if at least three of their fighters are Captured, then returned to them willingly by their Captors (i.e., not recovered by the gang as part of the Public Execution scenario). Once a gang has changed sides it may not change back – both the Imperial House and the Dark Gods have little sympathy for traitors to their cause.
Determine Territories
At the start of the Uprising Campaign, each player’s gang begins in control of three Territories. One of these is determined by the type of gang they are playing as follows. This represents the gang’s home base or hideout and can never be lost, even if it is the only Territory the gang controls. The two remaining Territories are generated randomly (see page 88). There are no uncontrolled Territories in an Uprising Campaign.
Issuing and Accepting Challenges
During an Uprising Campaign, battles are fought on a challenge basis:
- During each cycle, each player may issue one
challenge to another gang to do battle:
- In the first cycle, challenges are made in a random order.
- In later cycles, they are made in ascending order of Gang Rating, starting with the gang with the lowest Gang Rating. If two gangs have the same Gang Rating, the winner of a roll-off makes their challenge first.
- No Territories are declared as the stake of the battle.
- If one of a gang’s fighters has been captured by another gang, rather than rolling on the Scenario table, a gang that has had one of its fighters captured by another gang may issue a challenge to that gang to play the Public Execution scenario (see page 108). If the challenge is declined, then the captured fighter is automatically returned.
- When a gang is challenged, they may accept or decline. If the challenge is accepted, a battle is fought. If the challenge is declined, the challenging gang automatically takes control of a random Territory controlled by the challenged gang.
- If a gang receives two or more challenges within a single cycle, they may decline the second and any subsequent challenges without penalty.
- If a player has played all outstanding battles (including their issued challenge and any challenges accepted) and there is still time left in the cycle, they may issue another challenge.
If, at the end of the battle, the winning gang inflicted three times as many Out of Action results on their opponent as they themselves suffered (not counting models that left the battlefield voluntarily or fled because of a failed Bottle check), then they take control of one of their opponent’s Territories chosen at random. Otherwise, no Territory changes control.
Scenario Selection Table
Once players have determined who their gangs are fighting, they should roll on the Uprising Scenarios table below to determine which scenario they will play. In some cases, there will be a choice as to which scenario is played. In these cases, the player whose gang is fighting for the side with Ascendancy (see page 80) may choose.
Uprising Scenarios Table
| 2D6 | Result |
|---|---|
| 2-3 | Choose any scenario. |
| 4-5 | Play Meat Harvest or Scaveng. |
| 6-7 | Play Hit & Run or Show of Force. |
| 8-9 | Play Search & Destroy. |
| 10-12 | Choose any scenario. |
Goonhammer has suggested a better way of selecting scenarios for this campaign. See below.
| 2D6 | Result | Scenario Options |
|---|---|---|
| 2-5 | Disruption | Meat Harvest / Blood Rites / Search & Destroy |
| 6-7 | Destruction | Takeover / Sabotage / Border Dispute |
| 8-9 | Death Match | Stand-off / The Trap / Ambush |
| 10-12 | Underdog | Lower-Ranked player picks Scenario and Attack/Defend |