Resolving Hits Against Vehicles
Source: Necromunda Core Rulebook (2023)
When a vehicle suffers a Hit, follow this sequence:
- Determine Facing of Attack
- Make Wound Roll
- Make Save Roll
- Determine Damage
1. Determine Facing Of Attack
As noted in Vehicle Characteristics, all vehicles have three Toughness characteristics: Front, Side and Rear – each of which corresponds to the vehicle’s different vision arcs, as shown in the diagram below.
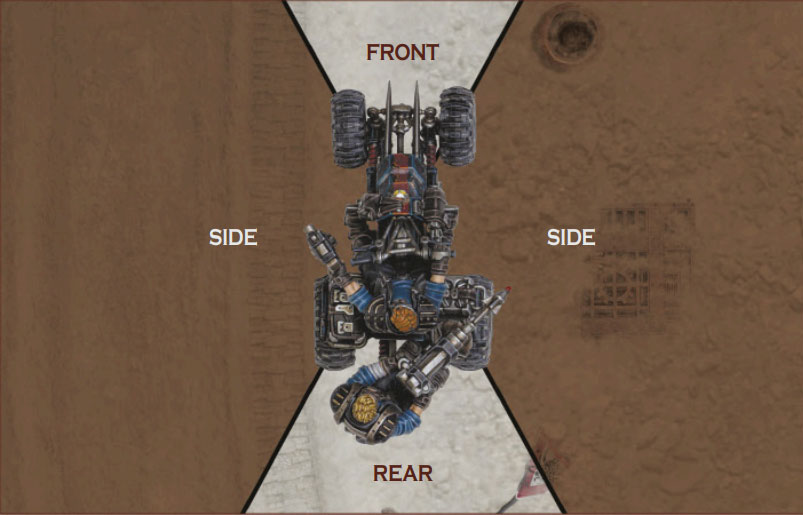
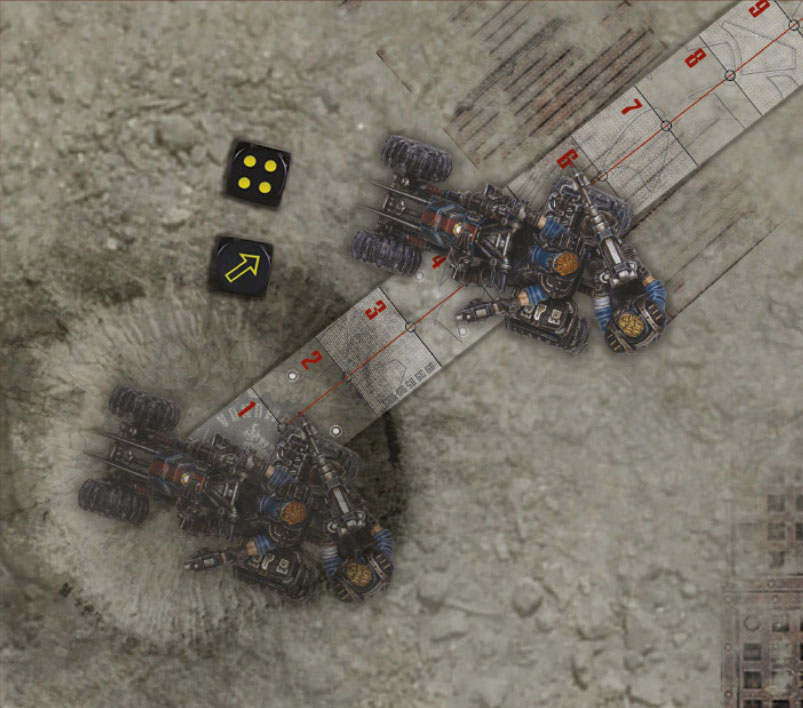
Every hit a vehicle suffers is resolved against one of these ‘facings’. Which facing has been hit depends upon where the attacking model is in relation to the vehicle. To determine this, imaginary lines are drawn from the vehicle, as shown in the diagram; whichever arc the centre of the attacking model’s base (or central hole in the case of a Blast marker) is in is the facing hit.
If there is ever any doubt as to which facing has been hit (for example, if the imaginary line runs through the centre of the attacking model), the better Toughness value is always used.
Hull Down Vehicles
Sometimes, the attacking model will not be able to see any of the vehicle facing whose arc they are in. In these cases the vehicle is said to be hull down, and gains the benefit of being in Full Cover even if not sufficiently obscured.
2. Make Wound Roll
Whenever a Wound roll is made against a vehicle, it is always the opposing player that makes it. Cross reference the weapon’s Strength with the Toughness of the facing hit on the vehicle and roll a D6 on the table below to determine if the vehicle is wounded by the attack:
| Strength vs Toughness | D6 Roll Required |
|---|---|
| Is the Strength TWICE the Toughness or greater? | 2+ |
| Is the Strength GREATER than the Toughness? | 3+ |
| Is the Strength EQUAL to the Toughness? | 4+ |
| Is the Strength LOWER than the Toughness? | 5+ |
| Is the Strength HALF the Toughness or lower? | 6+ |
3. Make Save Roll
If a hit results in a successful Wound roll, or leads to a Damage roll being made against the vehicle for any reason, the vehicle may be able to make a Save roll. This is done in exactly the same way as for fighters.
4. Determine Damage
Following an unsuccessful Save roll, instead of inflicting damage as normal, the opposing player should roll both the Damage dice and Location dice simultaneously. It is always the opposing player that rolls Damage dice and Location dice.
A. Location Hit
One or more Location dice are rolled to determine the exact location hit.
In some cases, it will be impossible to hit a certain location from a specific facing (as described in the vehicle’s special rules). Should it ever occur that an impossible location has been hit, simply re-roll the Location dice until a location that can be hit is rolled.
Multiple Location Dice
Players should note that, in some cases, more than one Location dice is rolled. When this is the case, it is usual for the player that made the roll to choose a single result to resolve and discard the other dice. Sometimes, however, it may be the player that controls the vehicle that chooses which result to apply. When this is the case, the rules will always make it clear.
In some cases, all of the Location dice rolled may be applied. For example, if a vehicle has suffered several hits at once from a Rapid Fire (X) weapon, a number of Location dice equal to the number of Hits is rolled. Again, when this is the case, the rules will always make it clear.
B. Roll Damage Dice
After a vehicle has been wounded, a number of Damage dice equal to the Damage characteristic are rolled. Unlike when rolling Injury dice for a wounded fighter, this is done every time a vehicle is successfully wounded regardless of Hull Points remaining.
Regardless of how many Damage dice are rolled, only one result is applied against the vehicle for each hit suffered – the benefit of rolling extra dice is an increased chance of inflicting significant damage! If more than one Damage dice is rolled for a hit, one result is chosen and the others are discarded. When this is the case, it is usual for the player that made the roll to choose a single result to resolve and discard the other dice. Sometimes, however, it may be the player that controls the vehicle that chooses which result to apply. When this is the case, the rules will always make it clear.
In some cases, more than one of the Damage dice rolled for a single hit may be applied. When this is the case, the rules will always make it clear.
Damage Dice
Damage dice are special dice used to determine the severity of the damage caused to a vehicle. Each face is marked with one of three different symbols. These are:


Damage Tables
Once the Damage dice have been rolled, look up on the following tables the effect of the chosen result(s) against the location hit. All damage effects applied are cumulative:
Body Damage Table
| Type of Hit | Effect |
|---|---|
| Glancing Hit | Crew Shaken: The vehicle and any fighters on board become subject to the Concussion condition and the vehicle immediately makes a Handling test. If this test is failed, it becomes Stationary and Stalled. |
| Penetrating Hit | Structural Damage: The vehicle loses one Hull Point and immediately makes a Handling test. If this test is failed, it becomes Stationary and Stalled. |
| Catastrophic Hit | Weapon Destroyed: One of the vehicle’s weapons (chosen at random) is damaged and cannot be used for the remainder of this battle. In addition, the vehicle loses one Hull Point. If the vehicle has no undamaged weapons, it loses two Hull Points instead. Additionally, the vehicle immediately makes a Loss of Control test. |
Engine Damage Table
| Type of Hit | Effect |
|---|---|
| Glancing Hit | Stutter: The vehicle immediately becomes Stationary and Stalled. |
| Penetrating Hit | Loss of Power: The vehicle loses one Hull Point and for the remainder of this battle it cannot move further than its Movement characteristic during its activation. Additionally, the vehicle immediately makes a Loss of Control test. |
| Catastrophic Hit | Belching Smoke & Flame: The vehicle loses two Hull Points and for the remainder of this battle it cannot move further than its Movement characteristic during its activation. Additionally, the vehicle immediately makes a Loss of Control test with a -1 modifier. |
Crew Damage Table
| Type of Hit | Effect |
|---|---|
| Glancing Hit | Crew Shaken: The vehicle and any fighters on board become subject to the Concussion condition and the vehicle immediately makes a Handling test. If this test is failed, it becomes Stationary and Stalled. |
| Penetrating Hit | Driver Wounded: The driver suffers a Flesh Wound, causing the vehicle to reduce both its BS and Handling characteristics by 1. In any End phase in which the driver has one or more Flesh Wounds, roll a D6 during the Recover & Restart step: • On a 1, the driver succumbs to their wounds and passes out. Immediately apply a Driver Black Out result against this vehicle (see below). Do not roll to see if they recover from it this round. • On a 2 or 3, the driver grits their teeth and carries on driving through the pain. • On a 4+, the driver is able to patch up their wounds. Remove one Flesh Wound (and its effects) from the driver. |
| Catastrophic Hit | Driver Black Out: The driver briefly loses consciousness. The vehicle immediately loses control as if it had failed a Loss of Control test, changes its Status to Stationary and Stalled, and if it has a Ready marker remove it. Do not add a Ready marker to this vehicle during the Ready Models step until the driver regains consciousness. In any End phase where the driver has blacked out, roll a D6 during the Recover & Restart step: • On a 1-3, the driver remains unconscious. • On a 4+, the driver comes round, they then suffer a Driver Wounded result (see above). Do not roll to see if they recover from it this round. |
Drive Damage Table
| Type of Hit | Effect |
|---|---|
| Glancing Hit | Tank Slapper: The vehicle immediately makes a Loss of Control test. |
| Penetrating Hit | Blow Out: The vehicle loses one Hull Point and for the remainder of this battle it suffers a -1 modifier to all Handling tests. Additionally, the vehicle immediately makes a Loss of Control test. |
| Catastrophic Hit | Major Malfunction: The vehicle loses two Hull Points and for the remainder of this battle it suffers a -2 modifier to all Handling tests. Additionally, the vehicle immediately makes a Loss of Control test. |
Wrecked Vehicles
When a vehicle is reduced to 0 Hull Points, or when a vehicle loses control and Rolls, that vehicle is Wrecked and will play no further part in the battle.
When this happens, players may wish to leave the model in place upon the battlefield, or they may wish to replace the model with a terrain feature representing a Wrecked vehicle of a similar size. Wrecked vehicles left in place in this way are treated as flimsy structures for the remainder of the battle. Alternatively, the model can simply be removed from play. In any case, the vehicle itself will suffer Lasting Damage, and any fighters aboard the vehicle will be Thrown Clear.
Thrown Clear
When a vehicle is Wrecked, any fighters on board it are thrown clear. When a fighter is thrown clear, they are placed within 2" of the vehicle and must take an Initiative test. If this test is passed, the fighter remains Standing. If, however, this test is failed, the fighter becomes Prone and Pinned and suffers a Hit as if they had fallen from the vehicle (see Falling), increasing the Strength, AP and Damage of the hit by 1 if the vehicle was Mobile when Wrecked.
Vehicles With Multiple Crew
Vehicles may be crewed by many gangers, however, in the rules we treat all members of a vehicle’s crew, regardless of number, as a single entity.
Injured Crew
Crew can be taken Out of Action just like any other fighter. If a vehicle is Wrecked, the crew is automatically taken Out of Action. However, when rolling for Lasting Injury for the crew, roll on the following table:
| D66 | Crew Injury |
|---|---|
| 11 | Lesson Learned: The crew goes into Convalescence but gains D3 Experience. |
| 12-26 | Out Cold: The crew misses the rest of the battle, but avoids any long term injuries. The crew recovers in time to perform post- battle actions. |
| 31-46 | Convalescence: The crew goes into Convalescence. |
| 51-52 | Humiliated: The crew goes into Convalescence. In addition, their Leadership and Cool characteristics are each decreased by 1. |
| 53-54 | Head Injury: The crew goes into Recovery. In addition, their Intelligence and Willpower characteristics are each decreased by 1. |
| 55-56 | Eye Injury: The crew goes into Recovery. In addition, their Ballistic Skill characteristic is decreased by 1. |
| 61-65 | Critical Injury: The crew is in a critical condition – if their injuries are not successfully treated by a visit to the Doc (see Medical Escort) in the post-battle sequence, they will die. |
| 66 | Memorable Death: The crew is killed instantly – not even the most talented Doc can save them. If the injury was caused by an Attack action, the attacker gains 1 additional XP. |
Lasting Damage
Whenever a vehicle is Wrecked, the opposing player immediately rolls a D6 and looks up the result on the Lasting Damage table opposite. During Campaign play, all results are applied against the vehicle and a note of all Lasting Damage sustained made on the gang roster.
In some cases, a vehicle may become Wrecked in several ways at once (being reduced to 0 Hull Points before Rolling, for example). In such a case, a separate roll for each is made on the Lasting Damage table and each result is applied. Rolling for Lasting Damage must be done during Campaign play. Should players wish, they can forgo this step during Skirmish play.
Going Into Repair
In some cases, a vehicle will become a Write-off. During Campaign play, this means that the vehicle is placed In Repair and cannot take part in any battles until it has been repaired (see Negotiate Repairs).
The vehicle’s In Repair box on the gang roster is checked to indicate this. Once the vehicle is repaired, it becomes available again.
| D6 | Lasting Damage |
|---|---|
| 1 | Persistent Rattle: There’s something not quite right. Apply a +1 modifier on any future Lasting Damage rolls made for this vehicle. |
| 2 | Handling Glitch: The vehicle suffers a -1 modifier to its Handling tests. |
| 3 | Unreliable: At the start of every battle, roll a D6 for each Unreliable Lasting Damage result this vehicle has sustained. If any of these rolls is a 1, the vehicle won’t start and cannot take part in the battle ahead. |
| 4 | Loss of Power: The vehicle’s Movement characteristic is reduced by 1". |
| 5 | Damaged Bodywork: Reduce each of the vehicle’s Toughness characteristics by 1. |
| 6 | Damaged Frame: Reduce the vehicle’s Hull Points characteristic by 1. |
| 7+ | Write-off: The vehicle is not currently roadworthy and cannot take part in any battles unless it is repaired (see Negotiate Repairs. |
Loss Of Control Tests
Several of the vehicle damage effects, as well as some actions, require a player to make a Loss of Control test for the vehicle. This may be due to an impact with another vehicle or terrain, damage caused to the vehicle by enemy attacks, or even as a result of the driver falling unconscious at the controls due to injuries sustained. Whatever the case, failing a Loss of Control test can have dramatic results.
To make a Loss of Control test, make a Handling test for the vehicle, applying any modifiers as required:
- If the test is passed, the driver maintains control of the vehicle and nothing untoward happens.
- If the test is failed, the driver has lost control:
- If the vehicle was Stationary, the force of the impact may turn the vehicle, causing it to pivot in place or, in extreme cases, to Roll.
- If the vehicle was Mobile, the impact causes the vehicle to swerve dangerously and veer off course or, in extreme cases, to Roll.
Fighters On Vehicles Losing Control
If a vehicle Swerves or Jackknifes then any fighters on it, and not in designated transport areas, must test to avoid falling.
Losing Control
When a Loss of Control test is failed, the vehicle’s controlling player rolls a D6 and the Control dice:
- If a Swerve is rolled on the Control dice, the vehicle pivots around its central point 45°.
- If a Jackknife is rolled on the Control dice, the vehicle pivots around its central point 90°.
- If a Roll is rolled on the Control dice, the vehicle is flipped over by the force of the impact.


In the case of a Swerve or a Jackknife, the direction the vehicle turns is determined by the D6:
- On a 1-3, the vehicle turns left.
- On a 4-6, the vehicle turns right.
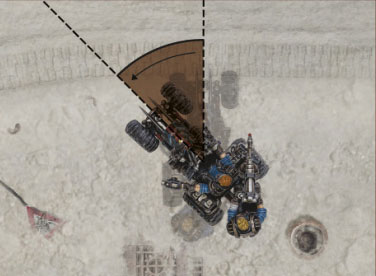
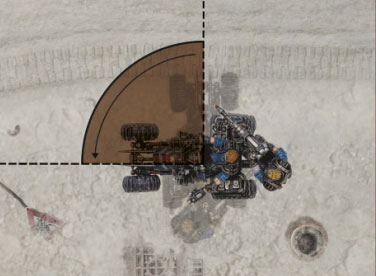
Here we see a vehicle pivoted 45° and 90° to the left around its central point.
Swerving And Jackknifing
If a Stationary vehicle Swerves or Jackknifes, it will simply pivot in place, as described above. However, if a Mobile vehicle Swerves or Jackknifes, it will pivot and then move a number of inches equal to half its Movement characteristic.
Rolling
If a Stationary vehicle Rolls, it will simply flip onto its side or roof in place, as described previously. However, if a Mobile vehicle Rolls, it will roll a number of times and move a number of inches in a random direction.
When a Mobile vehicle Rolls, the opposing player rolls a Scatter dice and a D3.
The Scatter dice determines the direction in which the vehicle moves as it Rolls. If a Hit is rolled, use the small arrow to determine direction.
The D3 determines how many times it rolls before coming to rest. The vehicle moves 2" in the direction determined by the Scatter dice for each roll it makes. During this movement, the vehicle is considered to be moving as if it were an active model, does not change facing and all vehicle impacts are resolved as Head-on Collisions. Note that the rolling vehicle takes no further damage.
Whatever the case, Rolling onto its side or roof is extremely detrimental to a vehicle and will render it immobile. A vehicle that Rolls is reduced to 0 Hull Points and is Wrecked. It will take no further part in the battle.